

An Introduction to LATEX for
Students of Computational Linguistics
This page is an English version of my notes for the LATEX introduction class which I last gave on 23-24 July 2008, upon request from our department's student representatives.
My idea was not to replace the many existing introductions to LATEX on the web, but instead to
- Explain what the advantages of using LATEX are, especially for students writing a term paper or a Master's thesis in computational linguistics;
- Discuss only very simple examples, and refer the students to existing material for more details;
- Rather, give a list of references aimed at beginners, because when I started using LATEX, I myself did not know where to start looking;
- In particular, go through examples on how to format trees, LFG-rules and AVMs, as well as on how to input the characters of the IPA, because this should be of interest to students in computational linguistics.
- Finally, show how to use BIBTEX, since a bibliography necessarily complements any college assignment.
Of course, what packages to use to do various things is very much a matter of personal taste. I am just mentioning here the packages I have personally used in papers I wrote over the course of my studies. If I find better solutions for doing the computational linguistics stuff, in the future I may change this page, provided I find the time to do so...
So What is LATEX, in the First Place?
- First of all, LATEX is not a WYSIWYG ("what you see is what you get") program such as M$-Word. This means that what you actually see while you are inputting your text has almost nothing in common with the resulting printable document.
- However, like word processors, LATEX is used to layout text.
- In a way, LATEX can be thought of as a sort of mark-up language, in the sense that you write your text in a file, and add various commands which tell the computer how it should format it (bold, italics, etc.).
- However, the program makes some decisions for you, according to the rules of typesetting that it knows about, and which are designed to make the final result look rather elegant: For example, it decides how much space to add at various points, where to start a new page, ...
- One big difference between LATEX and other mark-up languages (such as HTML) is that the result is not interpreted on the fly by some program which displays the formatted text, but instead you have to compile your source file to obtain the printable document. After compilation, the result cannot be modified directly anymore, but instead you have to modify the source file and re-run the compiler.
- In order to see what the result looks like, you need an extra program, which is called a previewer ("pre" because you usually want to view the file before going on to print it).
A few remarks:
- Recent versions of LATEX are called latex2e (latex 2.09 is obsolete).
- I am assuming a Unix/Linux-type system such as the one we have in our computer lab. Here is a little help to find things in KDE when you login the first time on the lab machines.
- LATEX can also be used on systems other than Linux/Unix. For those who want to try it out under Windows, here is a link which describes a LATEX installation using Miktex, Emacs, Auctex, Yap and GSview: http://www.math.aau.dk/~dethlef/Tips/install.html
- To edit a LATEX file, you need some editor of your choice. For the purpose of the introduction class, we used Emacs, which has a nice color mode for LATEX that helps avoiding typos in the commands. Those who are not familiar with Emacs should have a look at the built-in tutorial to learn to use it efficiently.
Why Should I Bother to Use LATEX?
First, the not-so-important advantages:
- It's free (most importantly in the GNU sense, but also in the sense that you can use it without paying prohibitive prices for software);
- The result is usually elegant, because LATEX is not a common word processor, but a real typesetting program, like the ones that are used to produce books. However, this is only true if it is used correctly, that is, if the user abstains from constantly interfering with the typesetting rules in LATEX, by, for example, untimely adding whitespace, ...
- Its behaviour is predictable: Whatever computer or OS you use it on, the result will be the same (provided you use the latest available versions of the packages).
But more importantly, for Colis at least:
- By loading additional packages, you can use LATEX to draw trees and attribute-value matrices (AVMs), input mathematical formulae and characters of the international phonetic alphabet, ... These are all things which computational linguists commonly need when they write papers.
- In the case of more substantial papers, LATEX does part of the work for you:
- It keeps track of the contents and prints a table of contents at the beginning of your paper;
- Compiles your bibliography and keeps it up-to-date when you add or remove references;
- Works out where figures and tables will look best, especially when you add or remove a paragraph on a page;
- Helps with cross-referencing and adapts the references if you later decide to move chapters or sections around.
One disadvantage however: LATEX is more difficult to learn to use than a word processor—I wouldn't recommend using it for the first time for your thesis!
Preliminaries: Set up the Color Mode in Emacs
This only has to be done once. Use Emacs to open up its own configuration file:
$ emacs ~/.emacs &Then add at the end of the file:
|
First Example: "Hello World" (in English)
Let us take a look at a very first example. On my computer, I have prepared a file example1.tex containing the following five lines:
|
So what is there to say about such a simple document? Well, actually, a few things:
- LATEX files have the ending .tex
- They always have two parts: a preamble and a body.
- In the preamble, you define the overall look of the document. The very first line always tells LATEX what kind of document you are writing: an article, i.e. a document in which all sections follow after one another without big blanks, or a report, a document with chapters, at the end of which the rest of the page is left blank, with the next chapter beginning on the top of a new page. For European-style documents, you should use \documentclass{scrartcl} for articles and \documentclass{scrreprt} for reports.
- The body of the document, in which you write your text, begins with the declaration \begin{document} and ends with \end{document}. After \end{document}, you can put anything you want: LATEX will just plain ignore it.
Ok, so now let us see what the result of compiling this file will look like. Fire up Emacs, enter the five lines shown above in the buffer, and save it as example1.tex. Then go back to your xterm, and type:
$ latex example1.tex
LATEX will process your file, and print out some information in your xterm. If LATEX finds a mistake in the file and can't go on, it will produce an error, and you will have to quit by typing "x" (that's a small letter x), then return, in the xterm. If this happens, check that you entered the example exactly as shown above.
You should learn to understand what LATEX is prints out as it processes a file, because when something goes wrong, this is always the first place to look. Normally, if everything goes fine, the essence of what LATEX will say should be something like: "Hello, this is latex, version number XYZ. The document I am processing is a scrartcl. We don't have an auxiliary file for this document yet, so I'm going to write one. The output I will put in example1.dvi, and the logs in example1.log."
Now take a look at what files LATEX created in the directory where you called it (using the command "ls"). The file example1.aux is where LATEX stocks information about cross-references in your document. It is updated each time you run LATEX, and used for the next compilation, which is why you may sometimes need to run LATEX twice in a row if you are using cross-references in your document (we will not cover cross-referencing in this introduction though, so have a look at the list of references below to learn how to do this). If there were any warnings (errors which didn't keep LATEX from producing an output file) that scrolled by too fast for you to see, you can also take a look at the log file.
The file example1.dvi is the output. You can take a look at it with kdvi or with the older xdvi:
$ kdvi example1.dvi &or
$ xdvi example1.dvi &
Here you will see that LATEX has added a page number. This is one of the things which LATEX commonly does for you, unless you explicitely ask it not to.
This .dvi file, however, cannot yet be printed. First we need to convert it to the Postscript format, which is what our printers understands. To do this, in your xterm, use the command dvips, followed first by the switch -o and the output file (careful, never forget this! if you do, dvips will send your file straight to the printer, without giving you a chance to make sure it really looks the way it should) and then by the input file:
$ dvips -o example1.ps example1.dvi
This will output a file example1.ps, which you can open with Ghostview (gv) and print with lpr. Note that in Ghostview, you might want to activate the "Watch File" Option when working with LATEX (choose the menu "State", then "gv Options", and make sure the last box in the lower left corner is light gray).
Second Example: A Basic Template
Imagine now you want to write your next college assignment with LATEX. If you want to do this in German (or in any other language that uses diacritics), you are in for a bad surprise... Try adding some characters with diacritics to the body of your LATEX file, for instance a few German "Umlaute" like ä, ö, ü. If you then process the file as explained above, and then take a look at it, you will notice that the characters with diacritics do not appear in the resulting file!
The solution to this problem is shown in the template file which we are now going to discuss. It was provided to Ruth Kusterer and me a few years ago by Sebastian Pado, when Ruth and I made our first attempts at using LATEX.
If you open this file in Emacs, you will see the following (sorry, the comments in the file are unfortunately in German):
- First, the standard \documentclass declaration, with a few further options (which I do not personally use). If you wanted another font size than the standard one, this would also be the place to ask for it, by adding "10pt", "11pt" or "12pt" between the brackets.
- Then comes the two-line solution to our problem with diacritics:
\usepackage[T1]{fontenc}
\usepackage[latin1]{inputenc}
- After this, we load the appropriate hyphenation rules and translations for German (\usepackage[german]{babel}), and add one further package for a European-style document: \usepackage{indentfirst}. These and the following lines illustrate how to load additional packages in order to get additional functionality.
- Finally, before starting the main text, we add a few declarations which will do away with "club lines" (the first line of a paragraph on the last line of a page; also called "orphan lines") and "widow lines" (the last line of the paragraph on a new page):
\widowpenalty=10000
\clubpenalty=10000
\flushbottom
- This being done, we can now start the main document, and give it a standard header with the \title and \author and \maketitle declarations.
- Finally, the last thing to point out in this file is the declaration \tableofcontents, which takes care of generating the table of contents and keeping it up to date. The necessary information for the table of contents is contained in the auxiliary file, doc_temp.aux, which, as we mentioned earlier, is updated each time you run the compiler. Thus, if you run the compiler just once and take a look at the result, all you will see will be the line Inhaltsverzeichnis (which will be in German due to the earlier declaration \usepackage[german]{babel}). As soon as you run the compiler a second time though, you will see that LATEX has added a table of contents to the beginning of your document. Of course, this means that any time you make a change to the sectioning commands (once again, see the list of references for more details), you will always need to run the compiler twice over the document to get an updated table of contents.
References
As I said at the beginning, the point of this introduction is not to replace whatever documentation on LATEX can already be found on the web. Instead, I will give here a few pointers to existing introductions to LATEX, and then go right on to explain how I typeset trees and AVMs in my term papers, and how I managed to input the characters of the International Phonetic Alphabet, in the hope that this will spare other beginners the trouble researching adequate solutions.
- So if you want to know how to obtain italics, bold face, etc., know more about the sectioning commands (titles and subtitles) in LATEX or learn to use the cross-referencing mechanism, here are a few general introductions to LATEX:
- The Not So Short Introduction to LATEX2e, which is available at many places on the web. Translations in a number of languages are also available.
- The LATEX Navigator (Loria, "Laboratoire lorrain de recherche en informatique et ses applications", France)
- In German, there is the LATEX2e-Kurzbeschreibung and the LATEX Kochbuch.
- You can download packages (and find more documentation) on the following servers:
- You can also look up the syntax of a given command on the web. A tip: Using "latex2e" instead of just "latex" in search engines will avoid them returning both outdated results and pornographic material ;-) Here is an example, if you forget how to declare new commands.
- When something does not work the way you want it, or when you do not know what package to use to achieve a specific result, it is always a good idea to do a search in Google Groups. Very often, somebody else had the same problem a long time ago, asked about it, and got many answers, which can be easily be browsed. Take a look in comp.text.tex, de.comp.text.tex, fr.comp.text.tex. Of course, you can also ask questions, but you should only do that after you've read the documentation, checked your question hasn't been asked before and learning how to ask good questions.
- Recently Google has been finding a lot of answers for me on the Community Forum, although I haven't experimented with search possibilities there yet.
- When I started using LATEX, Julia Neu suggested the following book, where I still find a lot of answers today: "A Guide To Latex. Document preparation for beginners and advanced users", by Helmut Kopka & Patrick W. Daly (the German version of this book is much more extensive and is available in our department's library).
- Christoph Clodo especially recommends the "LATEX Companion" (2d Edition) by Frank Mittelbach and Michel Goossens, a book which points you to many packages to do all sorts of things and is also available in the library.
- For questions on how to typeset linguistics, there is also the LATEX for Linguists page.
LATEX for Computational Linguists
Next, we are going to discuss how to typeset various things useful for computational linguistics. Here is a file containing all the examples discussed below, for those who want to download it.Characters of the IPA
In order to input characters of the International Phonetic Alphabet, you need a package which is not centrally installed on the department servers. This means that you have to either install it for yourself, or use mine. To do this, open your bash configuration file:
$ emacs ~/.bashrc &Add to its end the following lines:
|
Once this is done, you can use the package tipa, whose documentation manual, tipaman.pdf, is available from CTAN. As an example, the following code
|
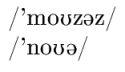
|
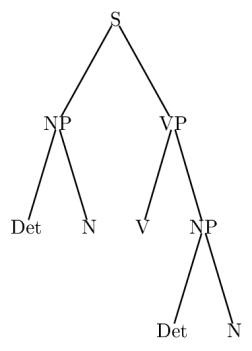
Trees
There are many ways to draw trees in LATEX, but until now, I have mainly experimented with one of them, which worked fine for me, so I have no reason to look for another, although many other solutions are described on the LATEX for linguists page. I used the PSTricks package, by adding the following to the preamble of my document:
|
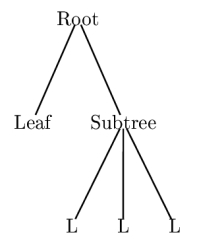
After this, I could draw trees with \pstree{}{}, which takes two arguments: first the root node, and then a list of daughters, which can be either leaves, or subtrees (recursion). All nodes have to be included in the command \Tr{}, which outputs their label.
|
|
There are many options in PSTricks to make those trees look better. Here are some links to documentation:
- The PSTricks page on LATEX for linguists
- The PSTricks homepage, which has a user manual and some pretty extensive examples
- Some articles which appeared in the magazine Baskerville (the "self styled annals of the UK TeX Users Group") and are available in my LATEX documentation folder.
If you want to practice, you can try drawing the tree below, and compare your code with the code I used. I guess the concept of recursion should be familiar to anyone studying computational linguistics ;-)
|
LFG rules
One of the very first things I had to figure out in LATEX was how to typeset LFG-rules in order to hand in my assignments for Syntactic Theory. Those were my very first attempts at using LATEX, so it took me a while to get it right. Here I will explain how I typeset the following rule (some of these ideas here were borrowed from Sebastian Pado and Ruth Fuchss):
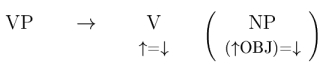
|
First I defined a command which will print the LFG-rule symbols above their proper annotation. The details of how this works can be looked up in any of the general introductions to LATEX mentioned in the references, but it really suffices to know that after you have added this to your preamble, you can write LFG-rule symbols as \symb{SYMBOL}{ANNOTATION}:
|
|
|
|
Attribute-Value Matrices
As for IPA, in order to input AVMs, you will first need to extend your search path so that the relevant packages are found. After that, you can use the avm package to typeset AVMs, by saying:
|
If you are studying computational linguistics, there are two types of AVMs which you are likely to typeset during the course of your studies. In both cases, in addition to typesetting the AVM, you will also need to know how to show co-indexation: with curves in LFG and with numbers in little square boxes in HPSG.
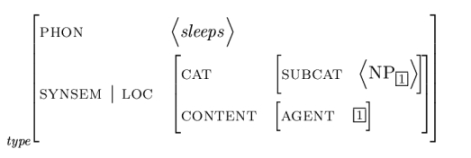
First let us discuss how to typeset the following AVM, which was once part of an LFG-assignment in Syntactic Theory (the sentence was "Who washed the car?"):

|
|
|
And now, let us take a look at an HPSG-AVM (this one was borrowed from the slides in "Grammatikformalismen" and simplified):
|
|
|
Bibliographies with BIBTEX
In order to use BIBTEX to manage your references, you first need to create a BIBTEX database file, which is simply a text document in which you specify the entries according to the BIBTEX syntax. The extension of the file should be .bib.
You can use Emacs to do this. When you create a new file with this extension in Emacs, a menu called Entry-Types appears. It contains the different entry types BIBTEX knows about. If, for example, you choose Book from this menu, BIBTEX creates a template for a book entry in the database file. Depending on the type of entry, the required fields change: the field journal, for example, is only relevant for journal articles, and the field editor only for some types of publications such as proceedings or books on a topic containing chapters written by several authors. If there are several fields preceded by ALT, only one of them must be completed. OPT fields are optional.
On the first line of the entry, behind its type, you should assign each entry a keyword, which will be used to refer to it in your LATEX source, for example @Book{ManningSchuetze, ...} In the authors field, you enter the authors names, separated by the keyword and: First Author and Second Author and Third Author and ... so on. Depending on the bibliography style you choose, the and's will become commas, ampersands, the word and, or whatever is appropriate. The easiest way to enter authors is to always input the first name first and then the last name, and this will work as long as you don't have particles such as von or van, or additions such as Junior or III.
In some fields, acronyms and words which must always be capitalized need to be entered between a pair of curly brackets, because otherwise BIBTEX will apply its own (fairly rudimendary) rules on capitalization. Also, make sure you have a comma at the end of the line after each field, otherwise BIBTEX will not be able to parse the file and may ignore some fields. This is the most common source of incomprehensible error messages when you begin using BIBTEX. When you are done completing an entry, pressing Ctrl-C twice will run a syntax check on the entry in Emacs, ensuring the entry is formally correct.
|
Now you have to tell LATEX to use the bibliography database you've just created. For that, at the end of your latex source file, at the point where you want the bibliography to be inserted, you add \bibliography{FILENAME}. Make sure you input the name of your database file without its .bib extension. Then, you also have to tell latex how to format the bibliography, because bibliography styles vary greatly depending on the field of research. One possibility to obtain a bibliography that conforms to computational linguistic standards is to add to the preamble of the document:
|
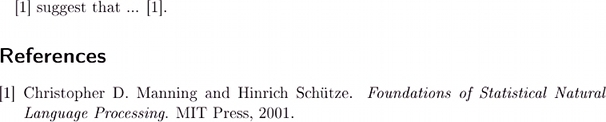
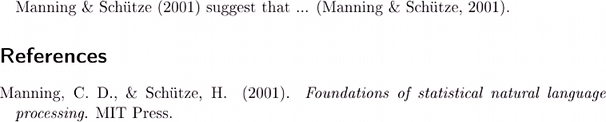
Now you can cite people with \citet{keyword} for citations in continuous text and \citep{keyword} for citations in parentheses at the end of a sentence. There are also many other variant commands of which you can find a summary on CTAN in the file natnotes.pdf.
Let me give an example, given the following text in your source code:
|
|
|